How To Add Custom Domain Name To Blogger Blog
I am showing you the powerful and easy method to install the custom domain to your blogger blog with some simple steps. Do you know why we need custom domain for blogger blog without using .BlogSpot.com ?

I am going to tell you why we should use custom domain on blogger to get more powerful results and for professional point of view.


I am going to tell you why we should use custom domain on blogger to get more powerful results and for professional point of view.

- Using your own domain name increase the visitors to your website and your site looks professional.
- You can enhance the audience and your working style.
- Its very frustrating if you have .blogspot.com domain, because its considered like normal sub-domain blog.
- Its easy to add your domain name to your blogger blog. .
- If you use your own professional .com, .net domain or any other brand name then its more secure and powerful then normal.

You have to do these steps for adding your domain on blogger.

- Go to blogger dashboard
- Select your blog that you want to add a custom domain
- Go to setting while clicking on the down arrow button display along with blogger.
- Now in a Basic setting under publishing section you can see the link to +add a custom domain click on it now.

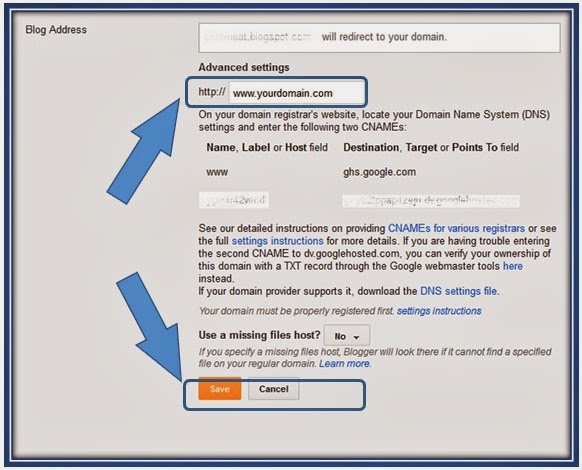
- Now you have to insert the domain name into the field which display after clicking on add a custom domain link.
- Be sure that you added www before adding the domain. (Here in blogger you can't use naked domain as main, if your hosting account allows this then it may possible).
- Download the setting file and read instruction link how to setup the DNS to your domain. (I explain it here). Read some setting of domain here
- Copy all CNAME setting that displayed on your page (like image below) to text document and it will use in domain settings. here are some cname setting about it

Now you just have to install the DNS setting on your domain manager and its very easy to do here is the step 3 which is installing the DNS or CNAME setting to your domain manager.

- Go to your domain controller where you buy the domain, like godaddy, namecheap, or name.com or any site where you buy your domain.
- Just look up at domain dns setting you have to set it that you copied in a text file previously.
- Set the DNS to ghs.google.com
- Complete the Label, Name, Host field section in your domain account and Set the Cname exactly your blogger account provides you.
- Now wait a little time and add the domain like the above picture shows.
After adding all of that you can enhance your blogger style with widgets explore more about widgets just go to homepage and see the powerful widgets which change the looks of your blog amazingly.
If there is any problem just let ask here and i try to solve it.


0 comments:
Post a Comment